
Create a Docker Image and deploy it on Google Cloud as a Cron Job by using R
Introduction
When you share your code with other people, it may not immediately work on their machine. They haven’t installed certain packages, they have a different R version or maybe another operating system. These issues are called dependency problems. Basically, one system needs another system in order to function properly, in the same way that one package needs the installation of other packages to function properly.
This is where Docker comes in. Docker solves all reproducibility and dependency problems.
Gratitude
First of all, I would like to express my gratitude to Michał Ludwicki. I had some difficulties setting up the googleCloudRunner package, and he created an entire github repo with examples just to show me how it works! In addition, he spent an hour with me on Skype. Thanks dude, you are great :)
Also, I would like to thank Mark Edmondson for creating the fabulous googleCloudRunner package.
Index
In this tutorial, you will learn:
- Why Docker is awesome
- How to create a Google Cloud project
- How to activate APIs on Google Cloud
- How to create credentials: API Keys, OAuth client ID and Service Accounts
- How to connect to Google Big Query by using R in a non-interactive session
- How to configure docker
- How to run an existing docker container
- How to create a docker image
- How to run a newly created docker container
- How to deploy a docker image on Google Cloud
- How to configure the GoogleCloudRunner package
- How to create a cloud build by using a docker image
- How to schedule a cron job by using a cloud build
Docker
A docker container is like a machine that contains the instructions to run your code (which packages to install, which files to read, which scripts to run, etc.). No matter where you run your docker container, the instructions will ALWAYS be the same, so your container will always run properly.
This offers many advantages:
- Shareability: you can share your container with whomever you want and it will run flawlessly on their machine.
- Portability: you can create a container in your machine and run it in the cloud.
- Scalability: you can scale your container as much as you want.
- Reproducibility: As the dependencies are defined inside of the container, it will always run in the same way no matter the machine.
- Language-agnostic: docker containers work with any language and can contain multiple languages. In addition, other people can easily integrate your container in their code, even if they are using another language. For instance, this comes handy if you have developed a machine learning model in R, but the production team uses Python.
Docker Image Vs. Docker Container
If you are familiar with object oriented programming, a docker image is like a class, whereas a docker container is an instance of that class. In summary, a docker container is an instance of a docker image. As a consequence, in order to run a docker container, you first need to create a docker image.
Create a Google Cloud Project
First of all, connect to Google Cloud
Then, click in the the top left corner as displayed in the image below, and finally click on “new project”.
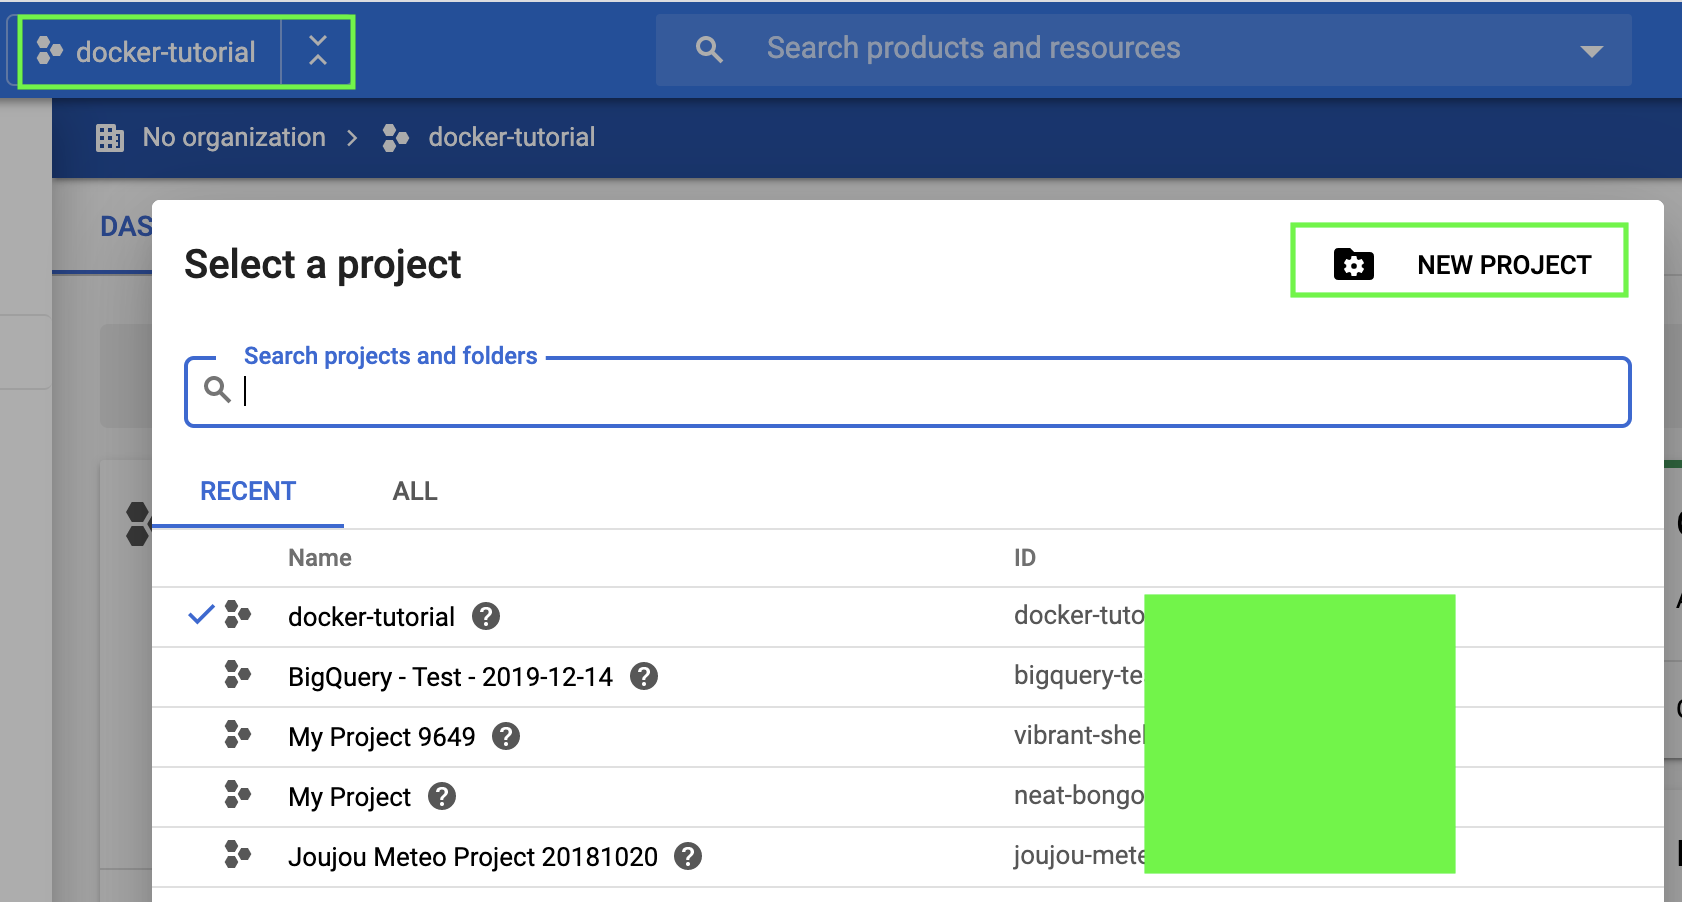
Finally, give a meaningful name to your project and click on “create”.
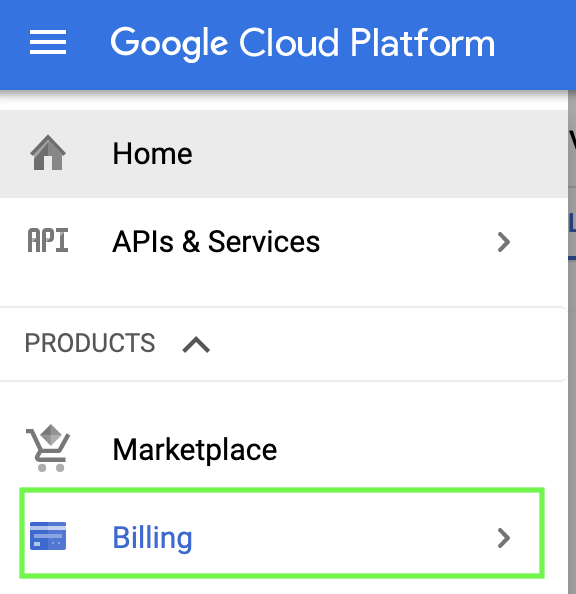
Billing
You need to activate billing in order to use your Google Cloud account. This is fine for this tutorial, as new clients get a $300 free credit.
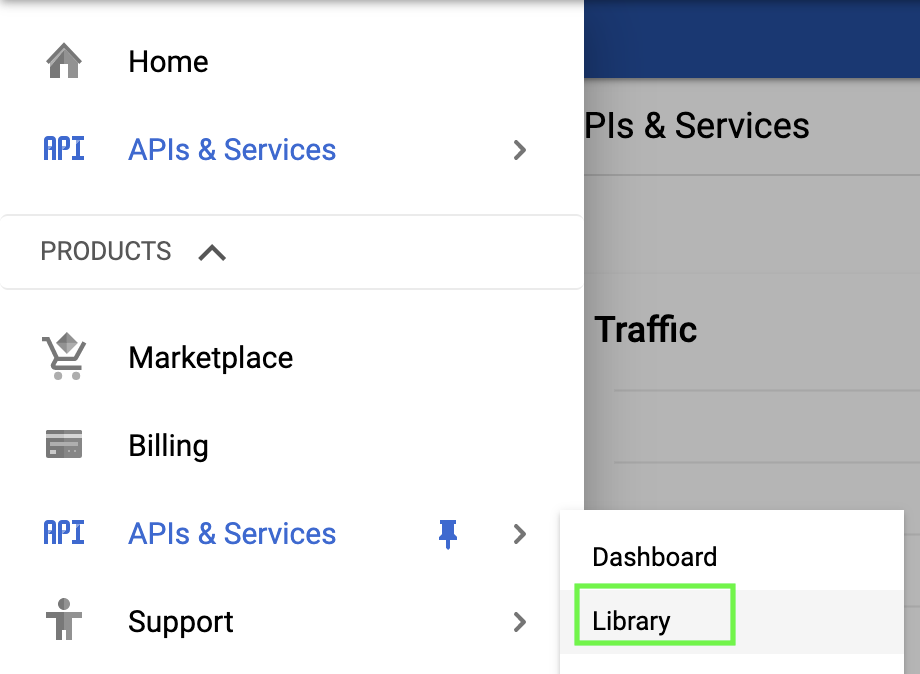
How to activate APIs on Google Cloud
Once you have a Google Cloud Project, you need to activate its different services. For instance, if you wanted to use big query to store your data, you would need to activate the Big Query API.
For this tutorial, we’ll need to enable the following APIs. Please, do not proceed before you have enabled all the APIs enlisted here, otherwise certain services may not work later:
- Cloud Run API
- BigQuery API
- Cloud Logging API
- Cloud Build API
- Cloud Datastore API
- Cloud Debugger API
- Cloud Monitoring API
- Cloud OS Login API
- Container Registry API
- IAM Service Account Credentials API
To do so, go to API & Services > Library:
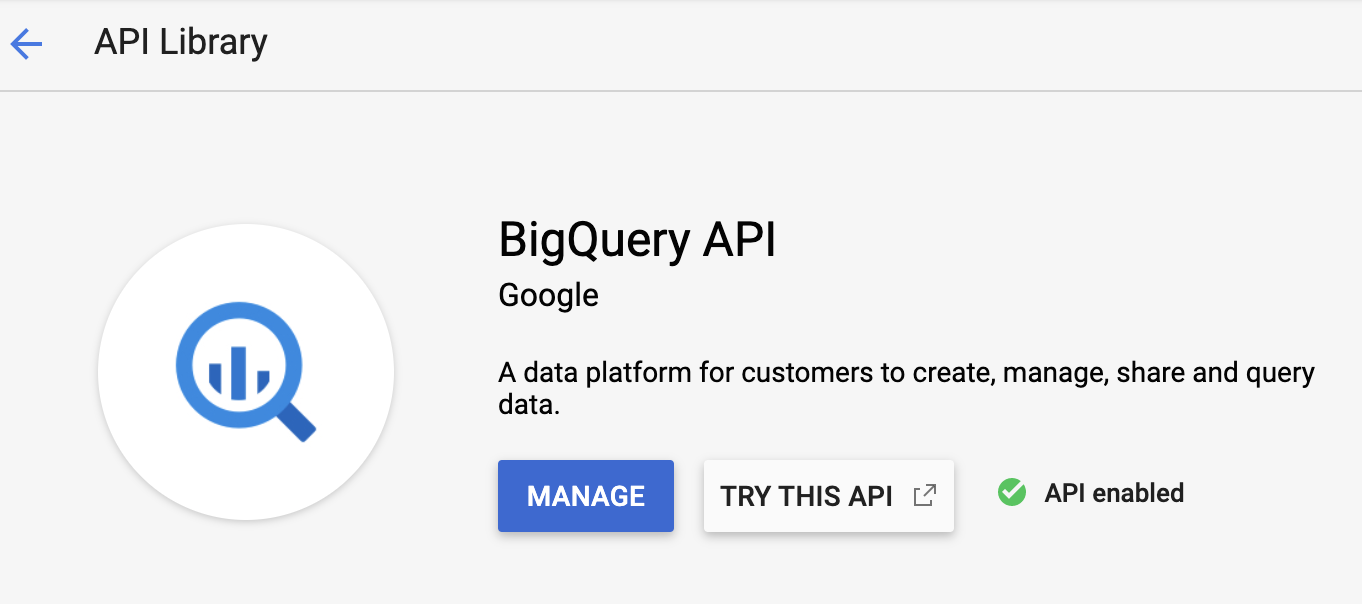
Once you find an API, click on it and enable it. Once you have enabled it, you should see something similar:
How to create credentials: API Keys, OAuth client ID and Service Accounts
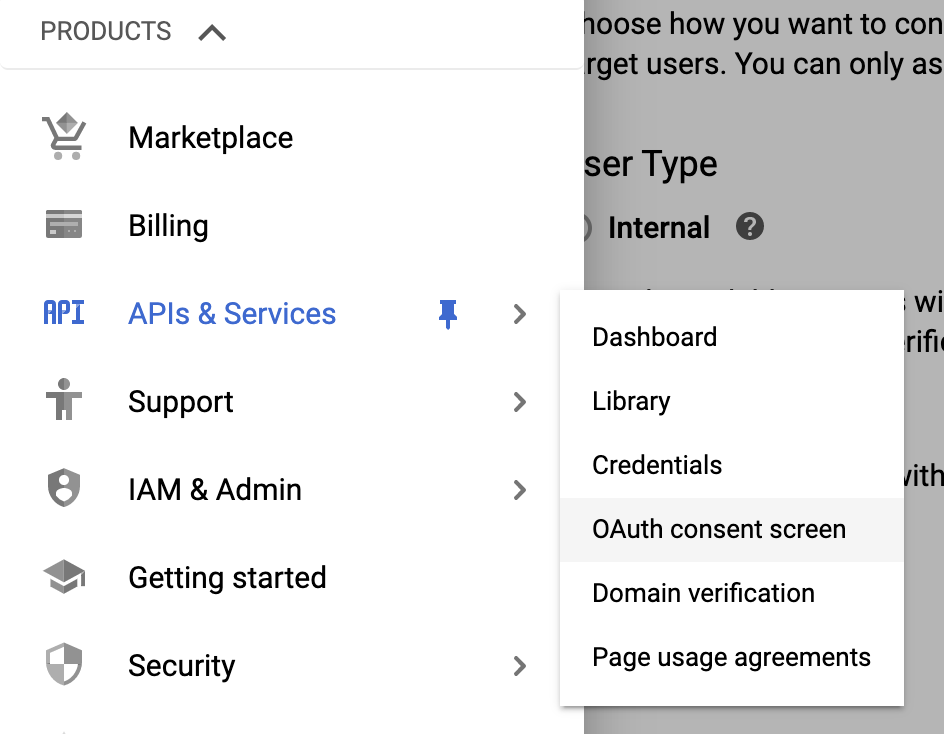
Before configuring our credentials, we need to configure the OAuth consent screen. To do so, go the following section:
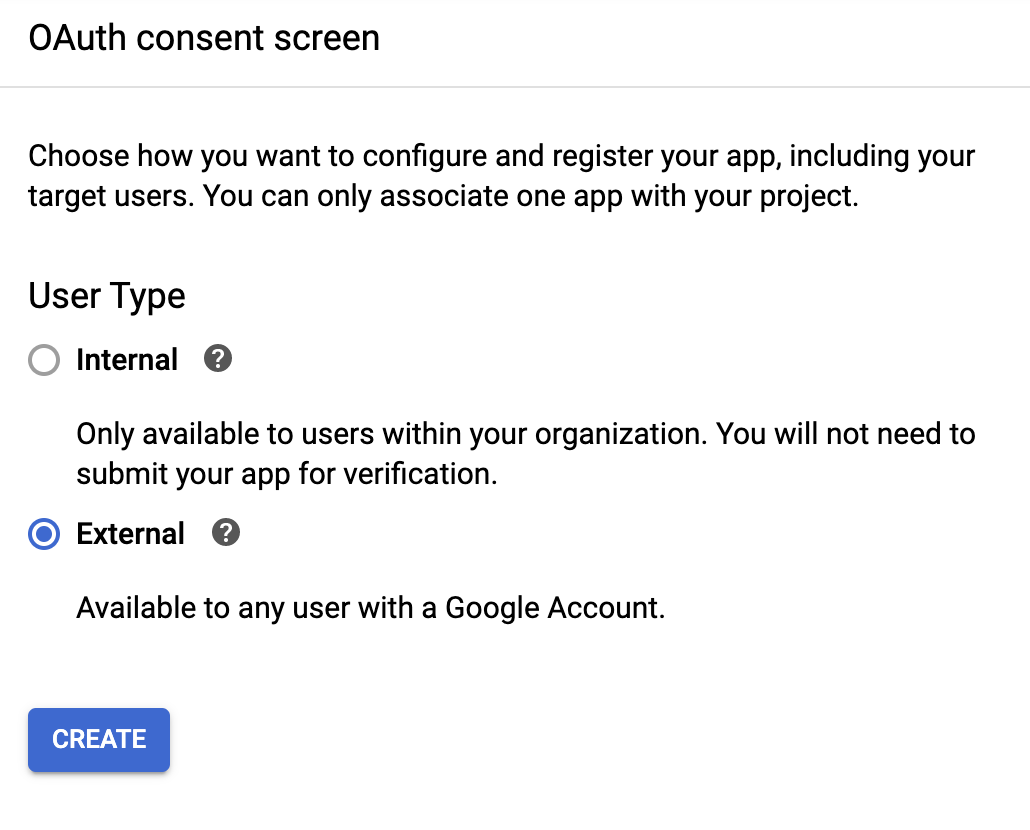
As a user type, select external:
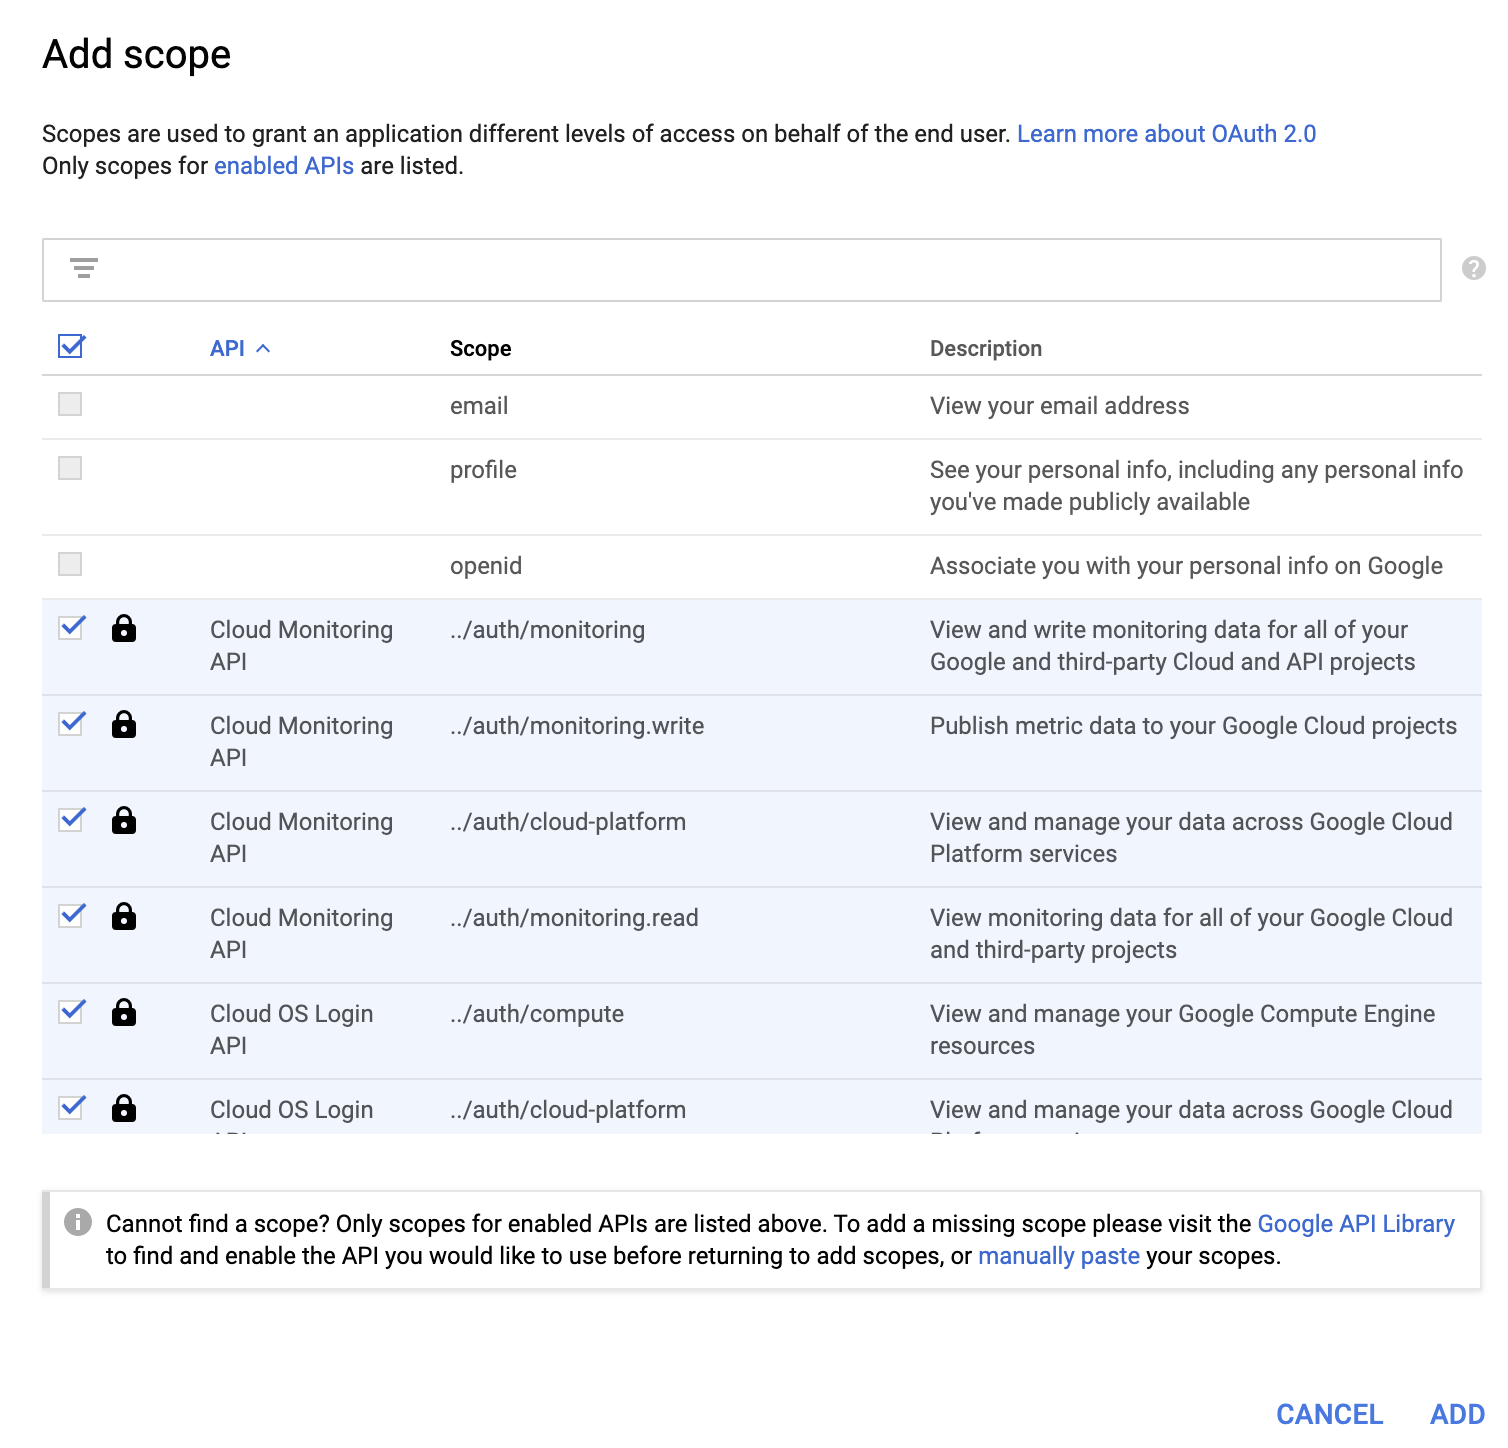
After you have given a name to your application, click on scope, and add all APIs present:
You can then click on save.
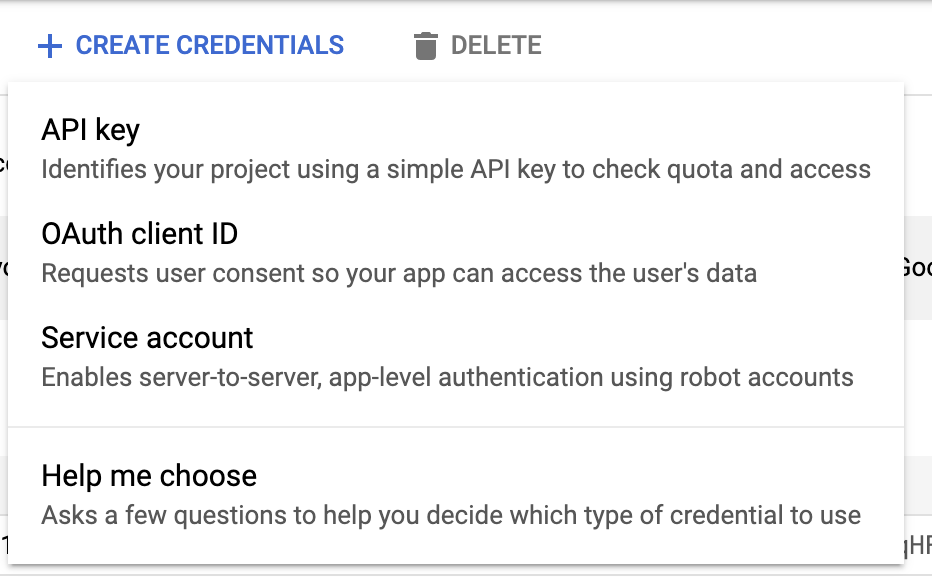
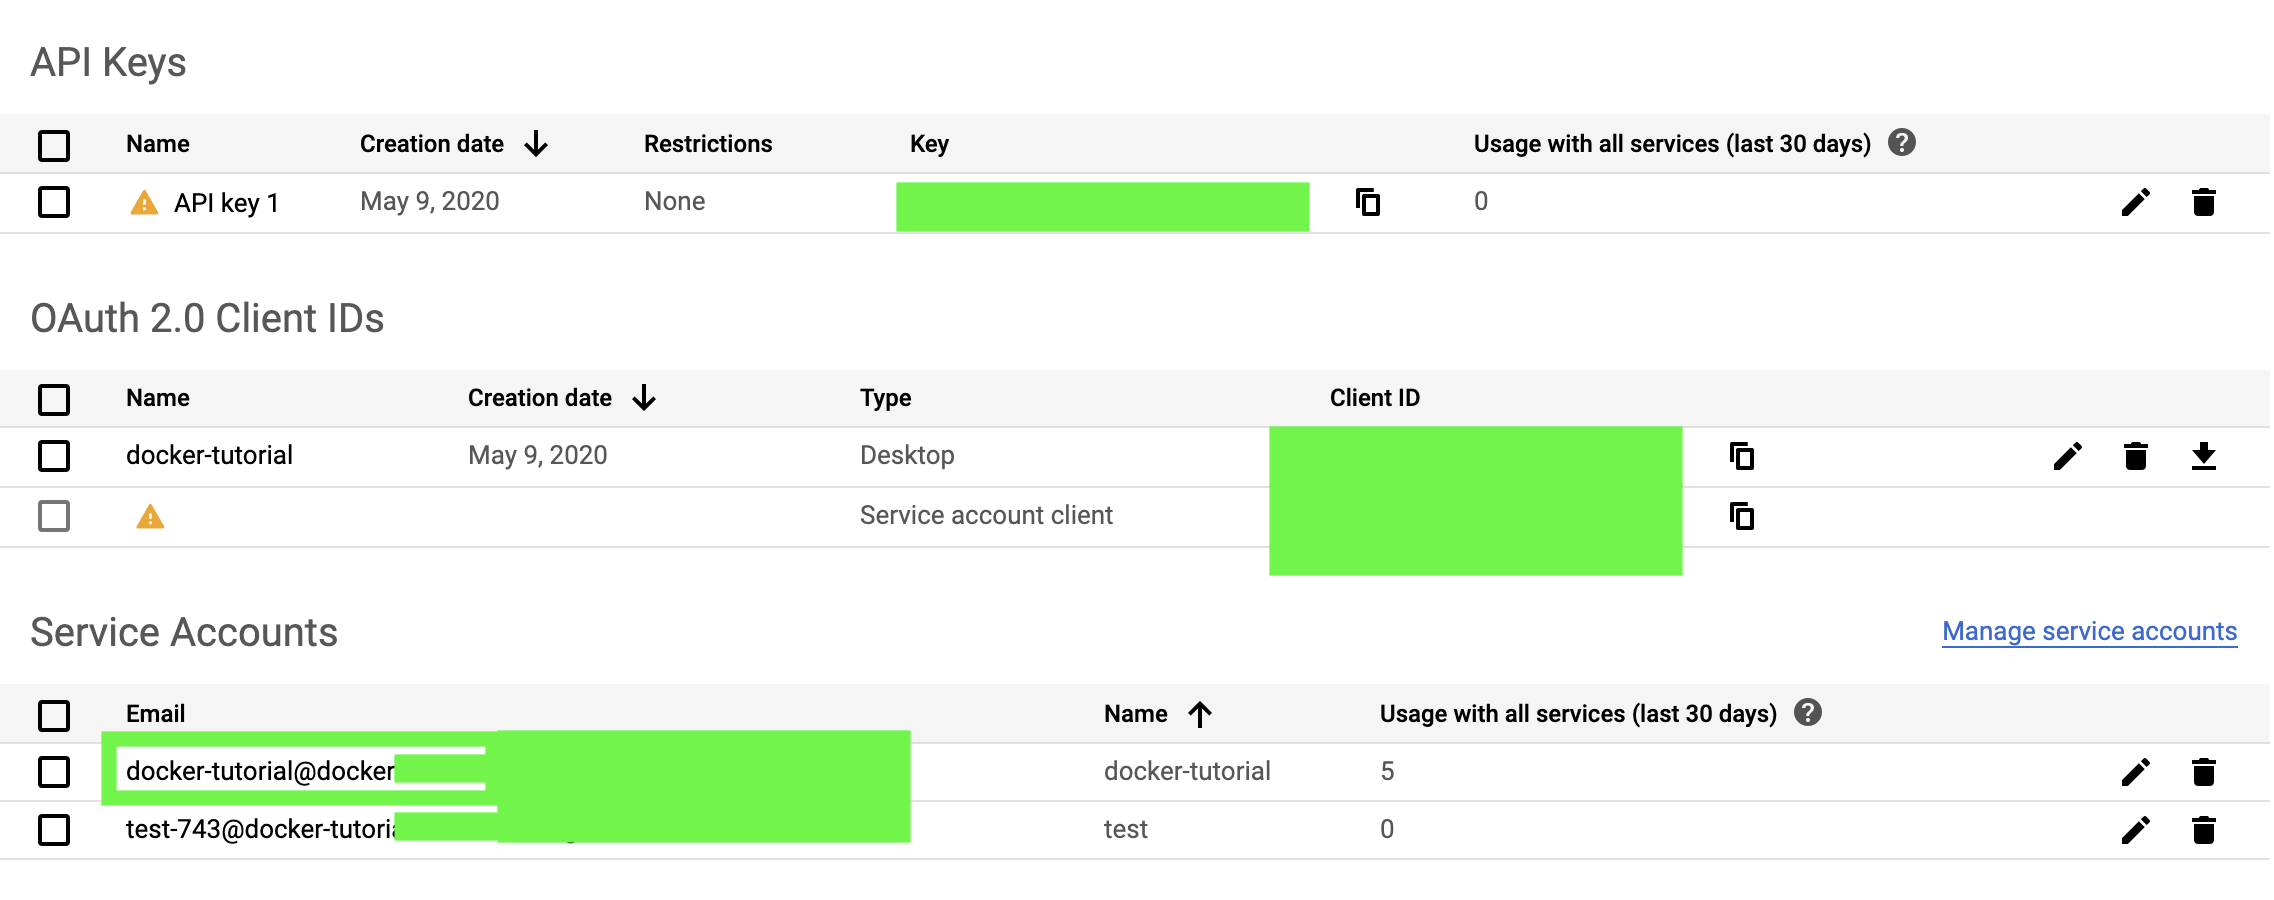
Now, click on credentials and create all the 3 things required: API Keys, OAuth client ID and Service Account:
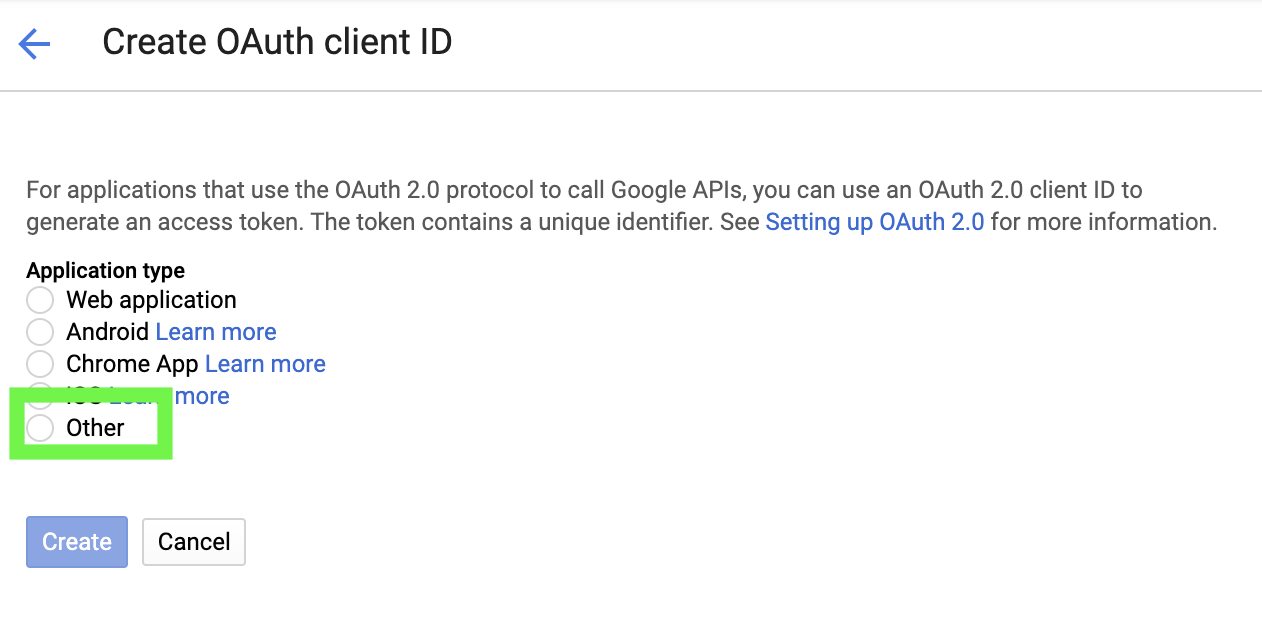
For the OAuth client ID, select “Other”:
When you create Service Account, enable all the roles that you see in the image below:
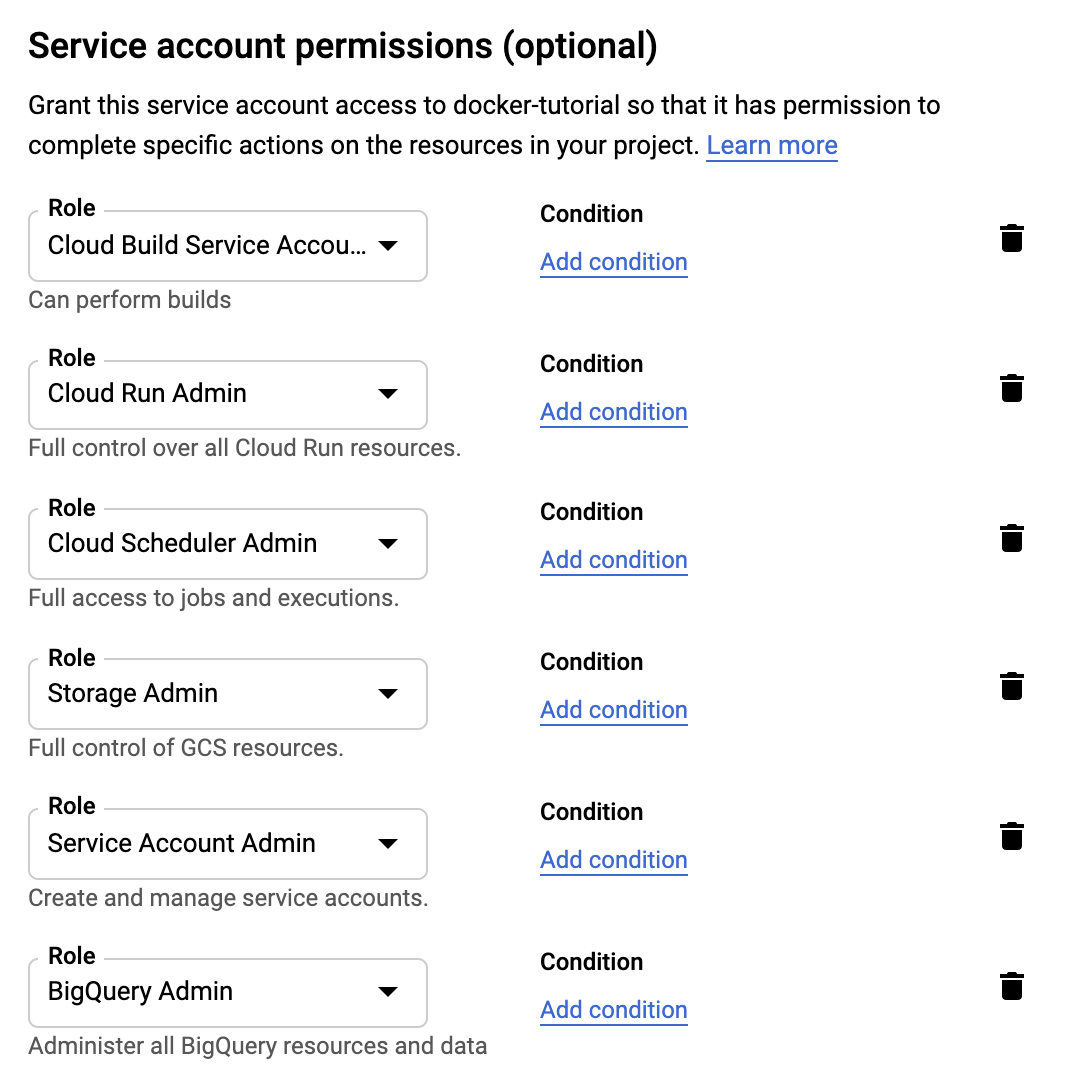
This is important so that the docker container can make changes on your behalf. Our container will run in a non-interactive session, which means we cannot manually authorize the container to make changes on our behalf. This means we need to give consent beforehand by adding roles to our Service Account Key.
Now, let’s download our Service Account Key. First, click on your service account key:
Then click on “Create Key”.
We’ll use this to connect to big query in a non-interactive session.
Save this somewhere in your computer as we’ll use it later.
How to connect to Google Big Query by using R in a non-interactive session
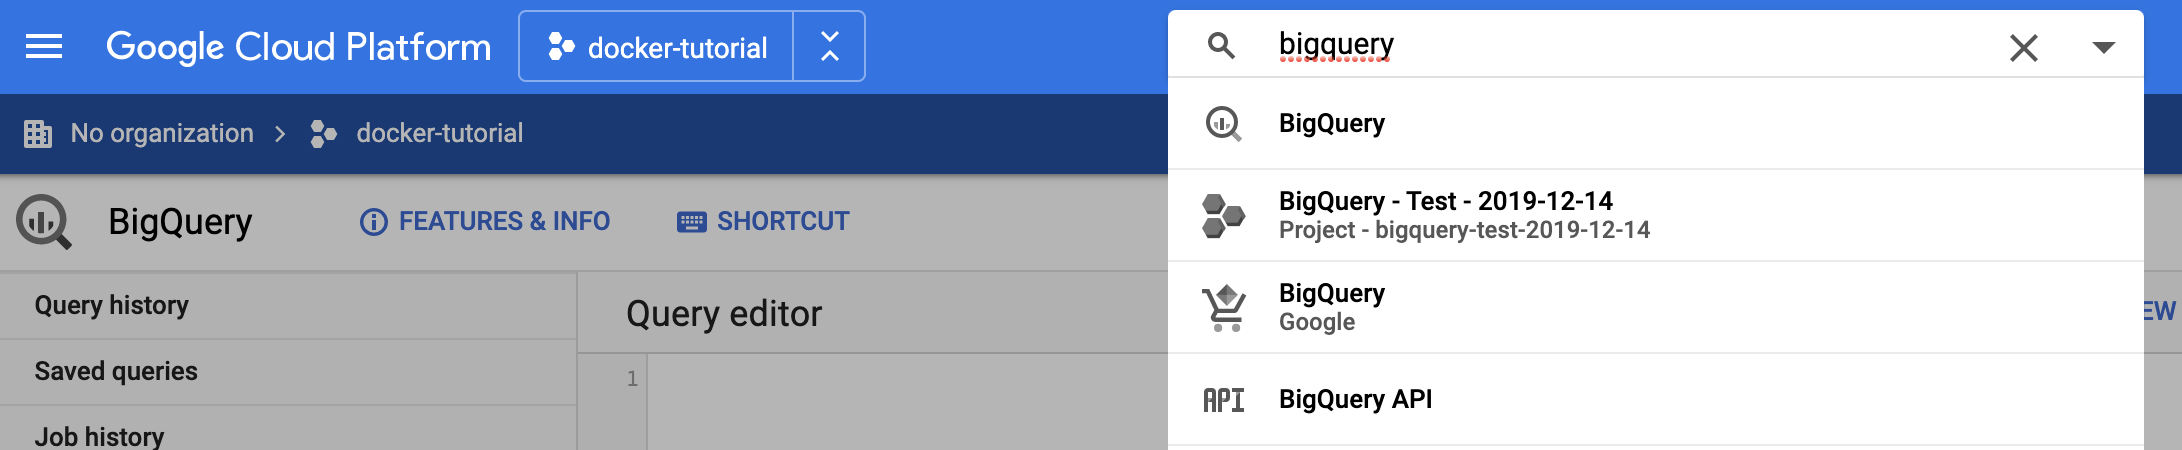
Type “bigquery”” in the search box and click on it:
Big query is formed by 3 components:
- Projects
- Datasets
- Tables
Projects are made of datasets, and datasets are made of tables.
On the bottom left of the screen, you can see the different projects:
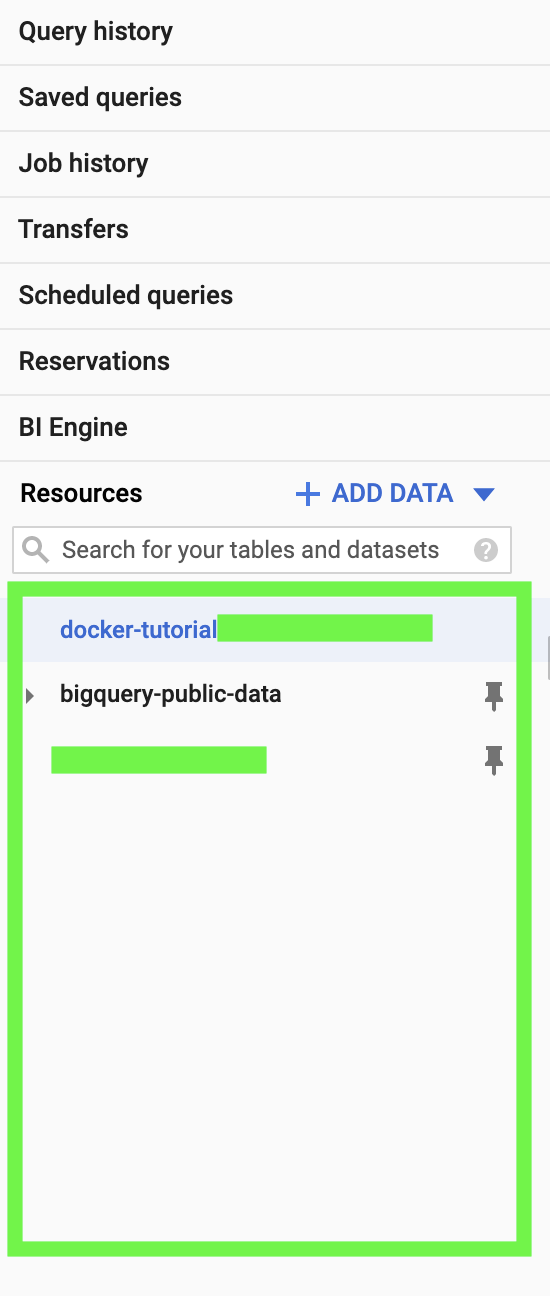
Click on the project that you created for this tutorial. It has a name similar to your Google Cloud project.
Click on create dataset:
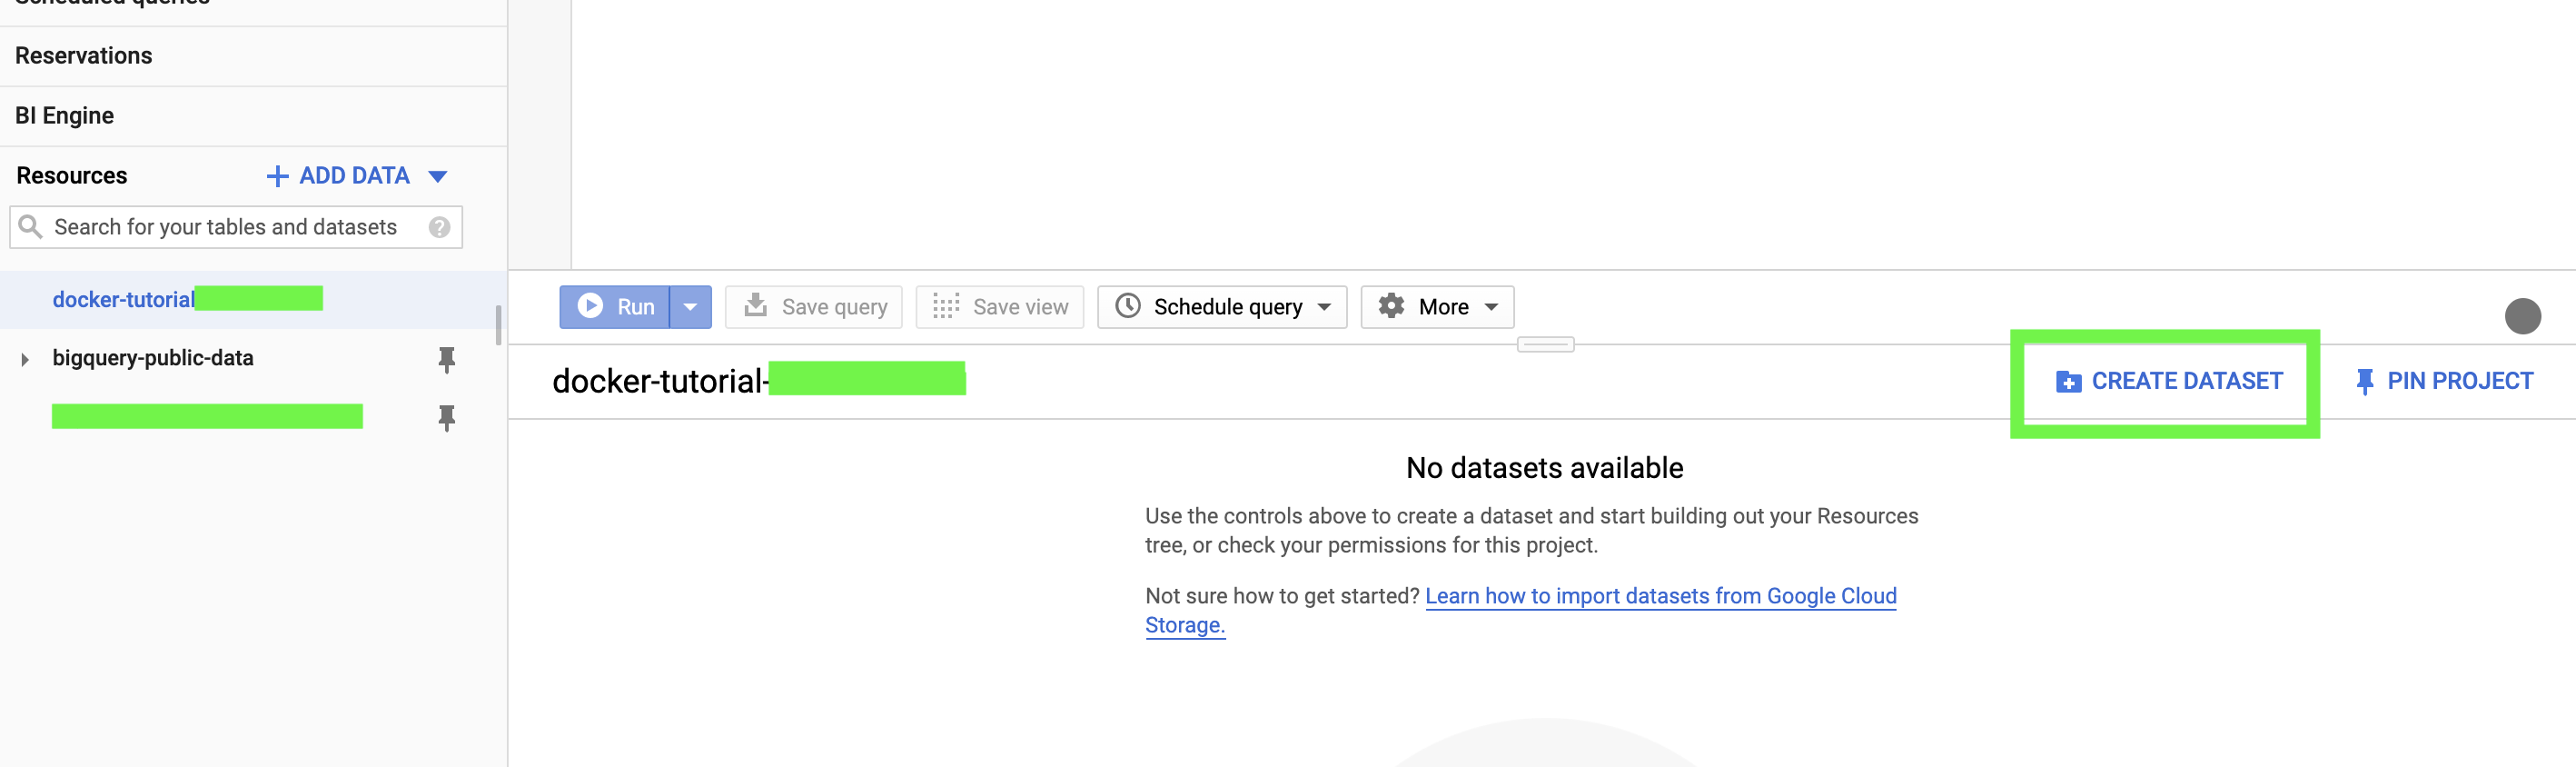
We’ll name this dataset “Docker_dataset”.
We’ll create the table later.
Now, let’s code a little bit.
Install and load the “bigrquery” and “tidyverse” packages:
install.packages("bigrquery")
library(bigrquery)
install.packages("tidyverse")
library(tidyverse)
Connect by using the Service Account Key that you previously saved. Maybe give it a easier name to remember. The first argument is the path to your Service Account Key, the second argument is the email associated with that Service Account Key (basically, the email with which you created your Google Cloud Proejct):
bq_auth("docker-tutorial-service.json", email = "name@gmail.com")
Now you have authenticated with big query and can make calls to the Big Query API.
Define three variable that contain our project, dataset and table name (I know, we don’t have a table yet):
project = "docker-tutorial-xxxxx"
dataset = "Docker_dataset"
table = "Docker_table"
The following code will create a new table on big query, which contains the current time:
# create table reference
table_2 = bq_table(project = project, dataset = dataset, table = table)

# create table
bq_table_create(table_2)

# upload current time on table
bq_table_upload(table_2, Sys.time() %>% as_tibble())
Once we have created a new table, we don’t need to use the following command any more, as the table already exists:
bq_table_upload(table_2, Sys.time() %>% as_tibble())
We can simply append new values:
job = insert_upload_job(project = project, data = dataset,
                        table = table, write_disposition = "WRITE_APPEND",
                        values = Sys.time() %>% as_tibble(), billing = project)

wait_for(job)
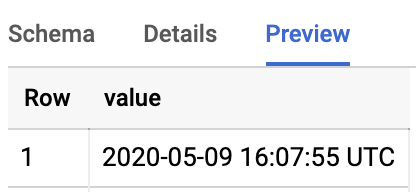
If you have done everything correctly, you should see the current time appended on your big query table:
Here is what the final code looks like:
install.packages("bigrquery")
library(bigrquery)
install.packages("tidyverse")
library(tidyverse)

bq_auth("docker-tutorial-service.json", email = "name@gmail.com")

project = "docker-tutorial-xxxx"
dataset = "Docker_dataset"
table = "Docker_table"

# create table reference
table_2 = bq_table(project = project, dataset = dataset, table = table)

# create table
bq_table_create(table)

# upload current time on table, run this only the first time
bq_table_upload(table_2, Sys.time() %>% as_tibble())

# the second time, run this code, so that you'll append on the existing table
job = insert_upload_job(project = project, data = dataset,
                        table = table, write_disposition = "WRITE_APPEND",
                        values = Sys.time() %>% as_tibble(), billing = project)

wait_for(job)
Now, you have made a call to the BigQuery API and added data to a table by using R. How cool is that? :D
How to configure Docker
First of all, install Docker. Here is the link for mac.
Create an account and log into Docker Desktop.
How to run an existing docker container
As mentioned at the beginning of this guide, one of the big advantages of Docker is shareability, that means that you can create docker images and share them with others.
The guys at the Rocker Project have already created several basic images that we can run. For example, they have created an image with rstudio preinstalled: rocker/rstudio.
As previously mentioned, a docker container is an instance of a docker image. Now we’ll try to create an instance of the following docker image: rocker/rstudio.
Go to the terminal in R and type the following code.
docker run --rm -e PASSWORD=123 -p 8787:8787 rocker/rstudio
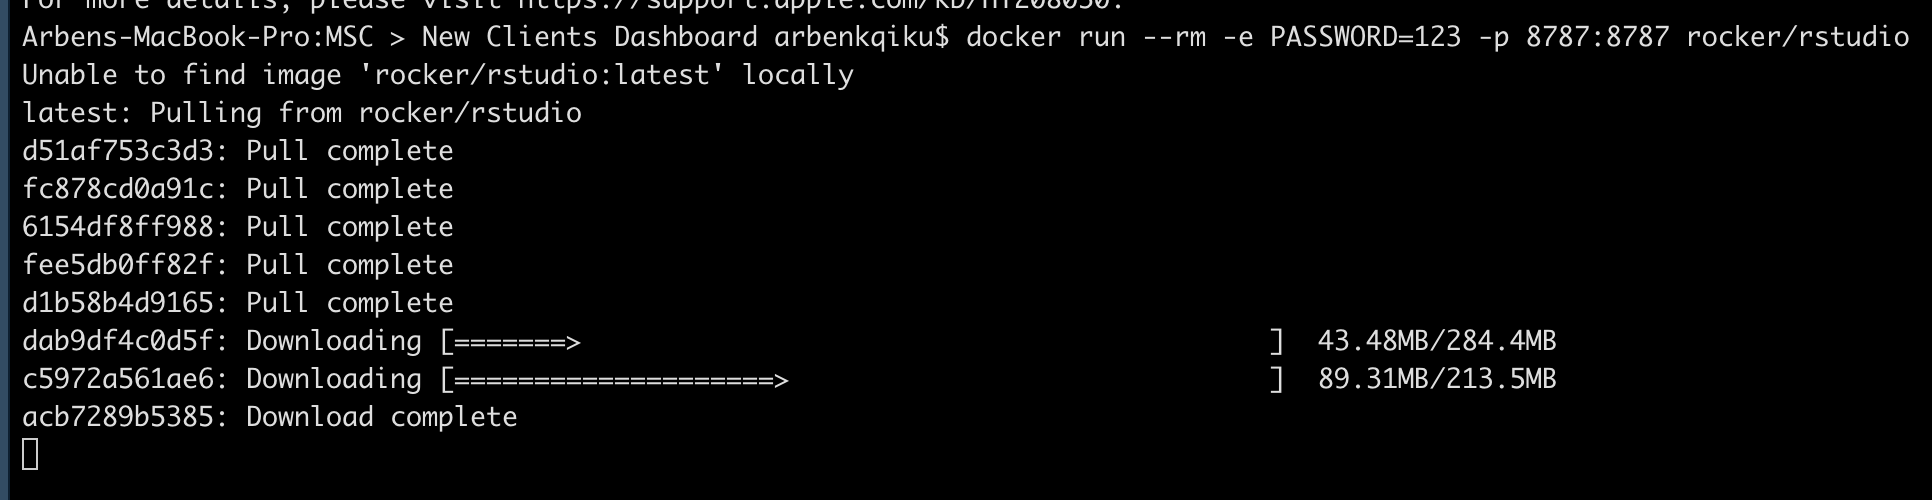
If the image is not present locally on your machine, your computer will look for it on docker hub (similar to GitHub, but for Docker Images), and if it exists, it will download it.
The “–rm” argument means that we’ll remove the container once we’re done with it, otherwise it will be saved on your machine. For example, if you have a daily cron job it means that the container will be saved every day and will occupy a lot of space eventually.
The “-e” argument stands for environment. Here we can define environmental variables such as “PASSWORD” and “-p”, which stands for port. The final argument “rocker/studio” is the docker image that we have downloaded and run as a docker container.
Now, go to your browser and type “localhost:8787”. As a user name, type “rstudio”, and as password, the password that you used in your “docker run” command, in this case “123”.
Now you have an instance of Rstudio in your browser! Isn’t that cool? :D
Now, you can click on “stop” in the terminal to halt the docker container.
Create a new docker image with dockerfile
Dockerfile is the file where the instructions on how to create a docker image are contained.
It is possible to build a docker image on top of a prexisting docker image. It is like adding toppings on a pizza. This is exactly what we’ll do right now. We’ll build a docker image on top of the “rocker/tidyverse” image. The “rocker/tidyverse” is the pizza, and we’ll add a few toppings such as packages, scripts, files, etc.
Create a new folder a make sure that the folder contains the following files:
- Your Service Account Key that you previously used
- A script that we’ll use to interact with big query
- A text file named “Dockerfile.txt”
Here is an example:
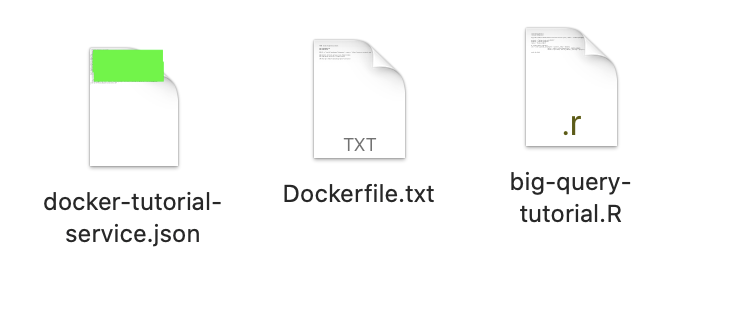
Here is the script that we’ll use. Copy it and save it in your folder under “big-query-tutorial.R”. Don’t forget to change the name of your Service Account Key, the email associated to it and the big query project, dataset and table parameters.
library(bigrquery)
library(tidyverse)

bq_auth("/home/rstudio/docker-tutorial-service.json", email = "name@gmail.com")

project = "docker-tutorial-xxxxx"
dataset = "Docker_dataset"
table = "Docker_table"

# create table reference
job = insert_upload_job(project = project, data = dataset,
                        table = table, write_disposition = "WRITE_APPEND",
                        values = Sys.time() %>% as_tibble(), billing = project)

wait_for(job)
What this script does is append the current time to the big query table that we previously created.
Here is the content of the file Dockerfile.txt:
FROM rocker/tidyverse:latest

ENV PASSWORD=123
ENV PORT=8787

RUN R -e "install.packages('bigrquery', repos = 'http://cran.us.r-project.org')"

ADD docker-tutorial-service.json /home/rstudio
ADD big-query-tutorial.R /home/rstudio

CMD Rscript /home/rstudio/big-query-tutorial.R
The FROM statement indicates the base docker image, in this case “rocker/tidyverse”. “latest” indicates the tag associated with that image (each time you push a new docker image you can associate a tag to it).
ENV PASSWORD=123 and ENV PORT=8787 are the environmental variables that we are passing to the new docker image. This is similar to the docker command that we previously ran, where we defined a password and a port.
With the following command, we are installing the package “bigrquery”:
RUN R -e "install.packages('bigrquery', repos = 'http://cran.us.r-project.org')"
This is important, otherwise when we’ll run the script we won’t be able to load the “bigrquery” package, as it doesn’t exist in the docker image.
With these commands we are adding the Service Account Key and the script that we’ll run. After the name of the files, we have added the folder in which we’ll save the files, in this case /home/rstudio. This will make sure that the files are available for our script:
ADD docker-tutorial-service.json /home/rstudio
ADD big-query-tutorial.R /home/rstudio
Finally, the following command launches the script that we have added. In is important to define the entire path.:
CMD Rscript /home/rstudio/big-query-tutorial.R
Now, go to the terminal in R and type “cd” + your folder path. In my case:
cd /Users/arbenkqiku/Desktop/Docker\ Tutorial/
In is important that the text file Dockerfile.txt and its associated files (Service Account Key and R Script) are all in that folder.
Now, go to the terminal and type the following command:
docker build -t docker-tutorial -f Dockerfile.txt .
This will create a new docker image named “docker-tutorial” by using the instructions in “Dockerfile.txt”
Type the following command in the terminal:
docker images
This will show you the new docker image that you have just created!

Success! You have created your first docker image :)
How to run a docker container
As mentioned multiple times, a docker container is an instance of a docker image. Now that we have created our docker image, it is fairly easy to run our container. Go to the terminal and type the following command:
docker run --rm docker-tutorial
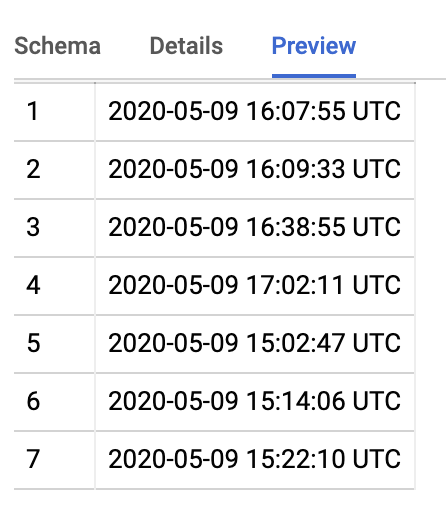
docker tutorial is the name of the docker image that we have created. If you now go back to big query, you should see a new current time appended (I have many as I ran it multiple times to test):
Now that we know that our docker image works properly, we can deploy it to Google Cloud. Yuppi! :D
How to deploy a docker image on Google Cloud
Before deploying a docker image on Google Cloud, you need to download the Google Cloud SDK and install it.
To do so, open a new a new terminal, it is better than using the R terminal.
Once you have installed the Google Cloud SDK, type the following command in the terminal:
gcloud auth login
Authenticate and get back to the terminal.
Then, you should type the following command:
docker tag docker-tutorial eu.gcr.io/docker-tutorial-xxxxx/docker-tutorial:latest
This command contains the docker command “docker tag”, followed by your source docker image “docker-tutorial” (in your computer), followed by “hostname/project-id/local-image-name:tag”. “local-image-name” is the name that the image will have on Google Cloud.
This command will simply tag your docker image before pushing it.
You could have several hostnames, I have selected “eu.gcr.io” as I am from Europe. Here is a list.
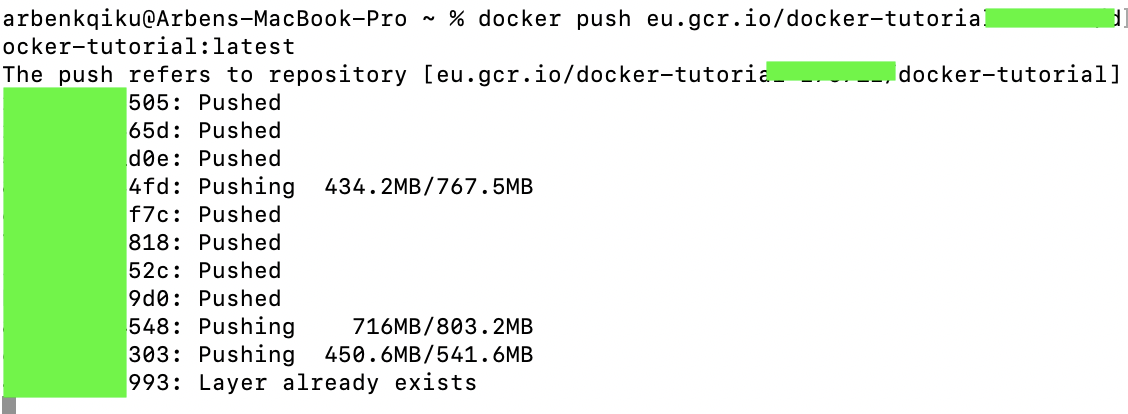
Then, you should type the following command:
docker push eu.gcr.io/docker-tutorial-xxxxx/docker-tutorial:latest
This command contains the docker command “docker push”, which pushes the docker image to the Google Cloud Cointainer Registry. Then, it is followed by “hostname/project-id/local-image-name:tag”.
I know it is not easy to remember these commands, so I have created a google sheet which concatenates the different elements. Make a copy of this sheet, replace the elements with your information and copy paste the commands.
For more information on these commands click here.
Here we can see we are pushing the docker image to the Container Registry:
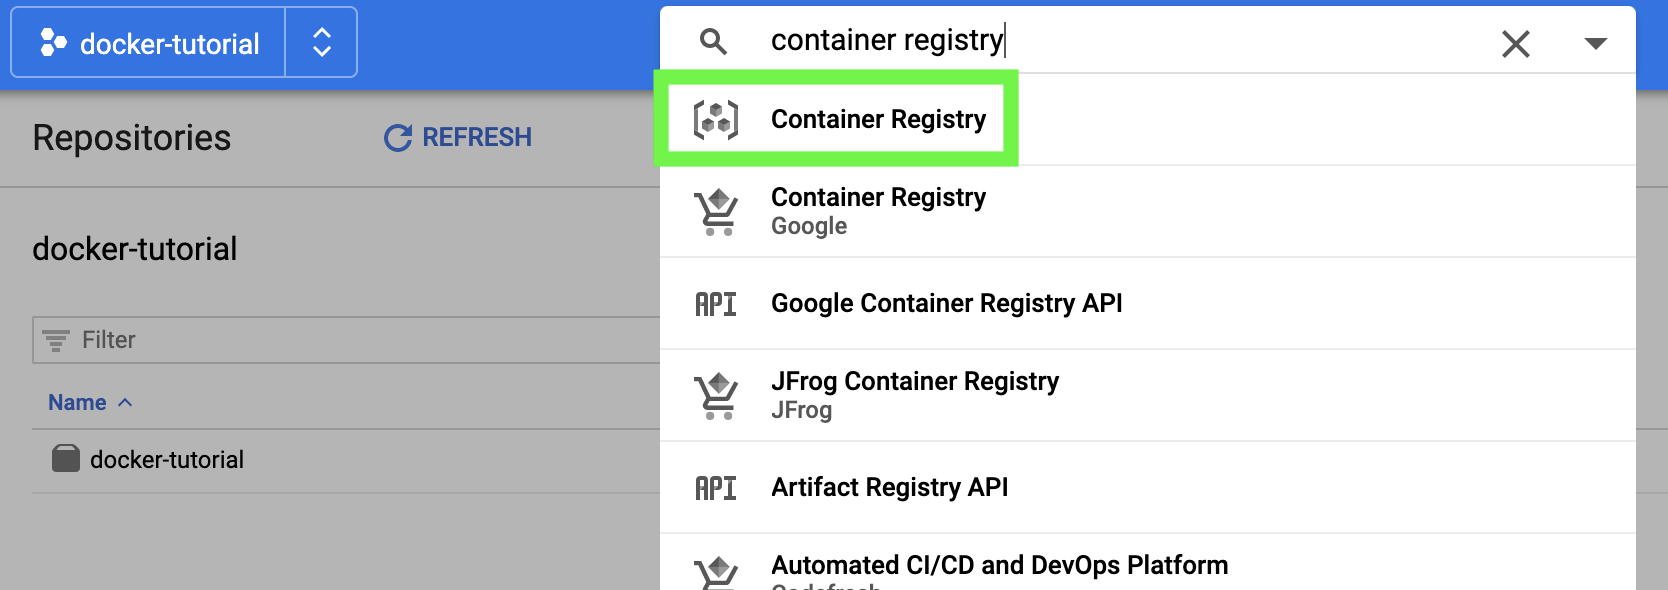
Now, go to the Google Cloud Console, type “container registry” and click on it:
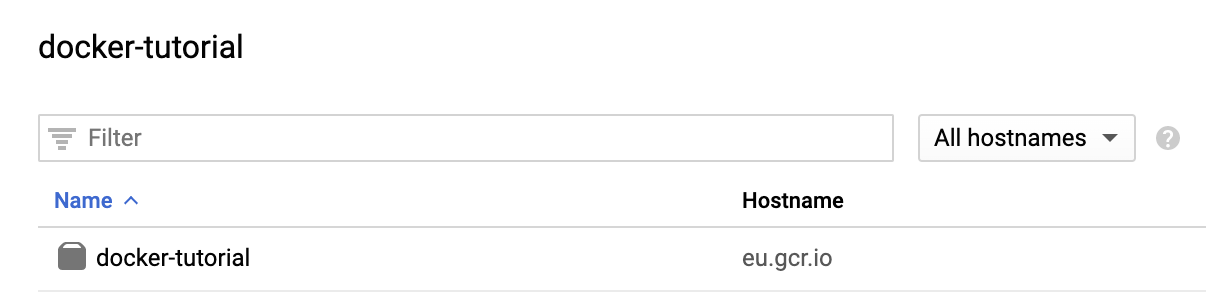
You should see the docker image that we have just pushed:
Congrats! You have just pushed a docker image to the Container Registry! :D
How to configure the GoogleCloudRunner package
Install and load the “googleCloudRunner” package:
install.packages("googleCloudRunner")
library(googleCloudRunner)
Follow the instructions on this excellent article written by Mark Edmondson.
How to create a cloud build by using a docker image
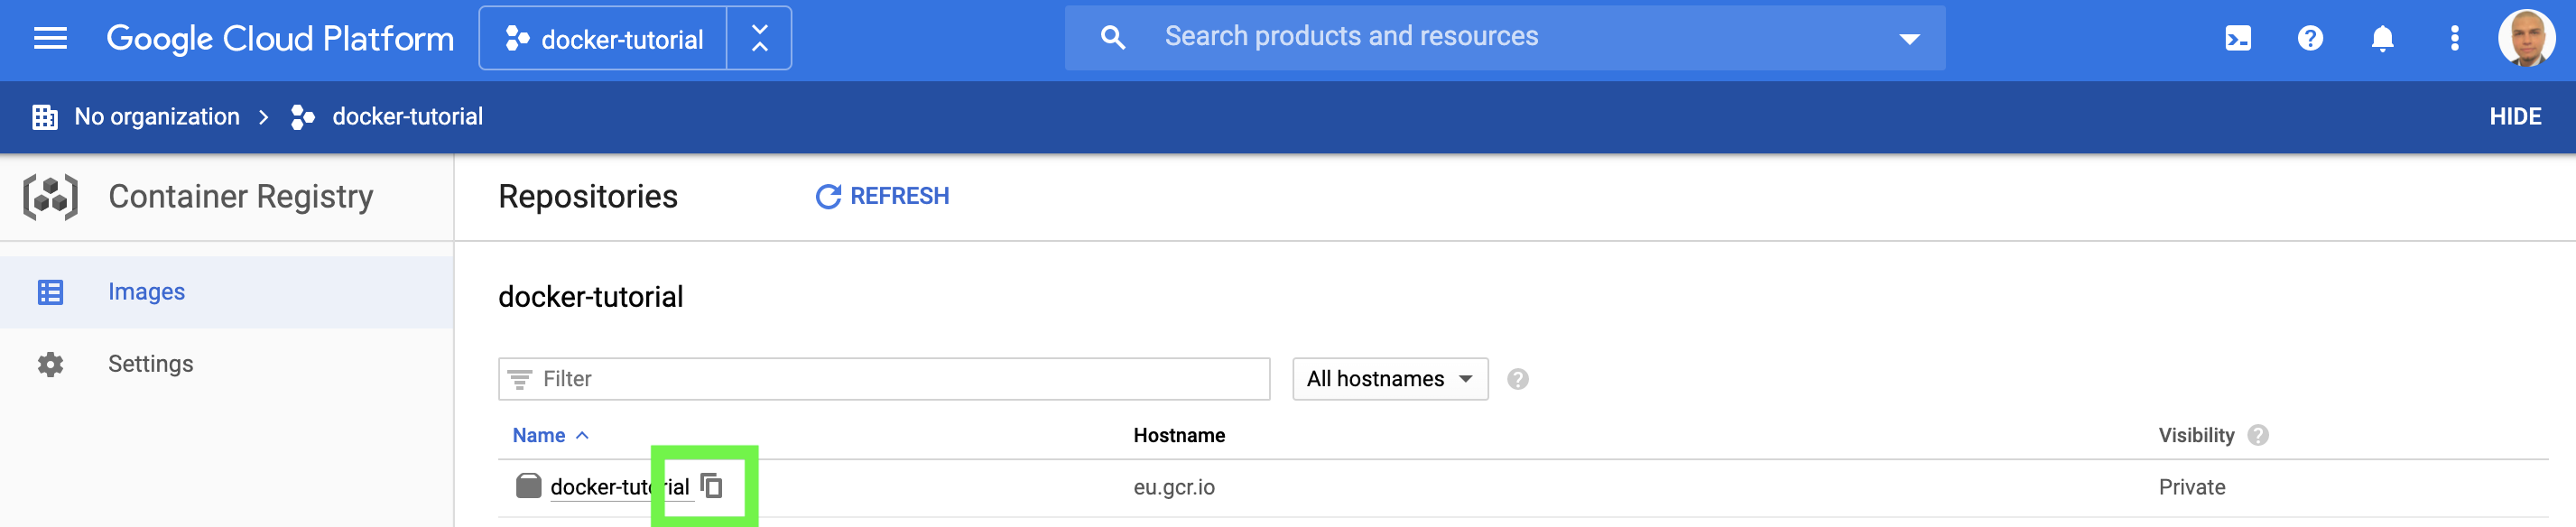
Now, go to the container registry and copy the full name of the deployed image:
Create a .yaml file with the following configuration. To create a yaml file download an editor such as Atom.
steps:
- name: 'name that you have just copied'
Here is a mockup example for me:
steps:
- name: 'eu.gcr.io/docker-tutorial/testestetestestestestesttestest'
A .yaml file simply contains the instructions on how to create a cloud build. It is similar to Dockerfile.txt, which contains the instructions on how to create a docker image.
Once you have created the yaml file, put it in the folder used for this tutorial. Then, create a build with the following command:
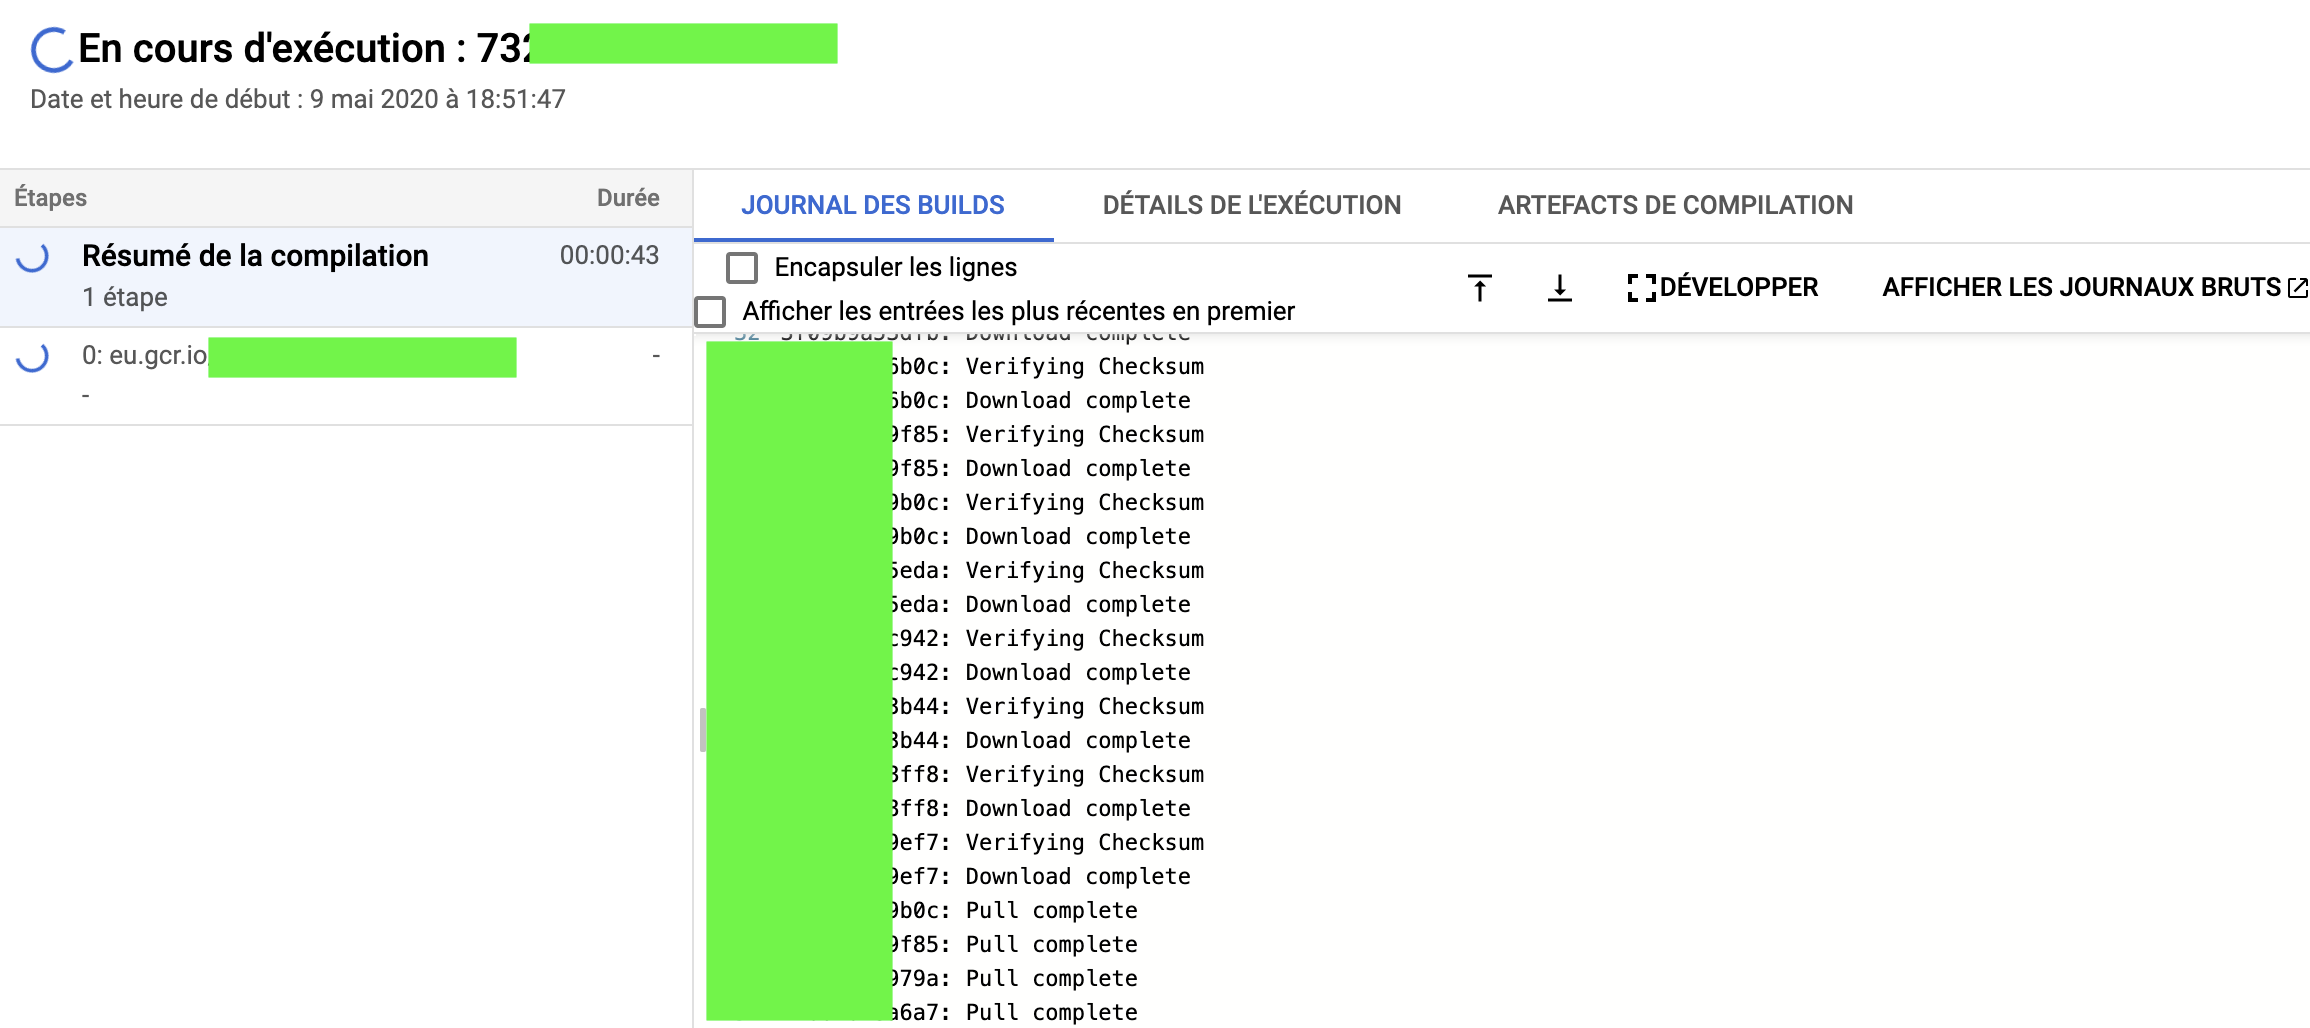
build = cr_build("docker-tutorial.yaml")
When you run this command, a window should open and you should you see Google Cloud creating the build:
A cloud build is basically a container image that we can use for other purposes. Cloud build allows you to start docker containers.
How to schedule a cron job of our cloud build
Now that we have created our build, it is fairly easy to schedule it. We’ll create a cron job named “big-query-test”.
build = cr_build("docker-tutorial.yaml")

cr_schedule("*/2 * * * *", name = "big-query-test", httpTarget = cr_build_schedule_http(build), region = "europe-west6")
This command will create a cron job that runs our newly created build every 2 minutes!
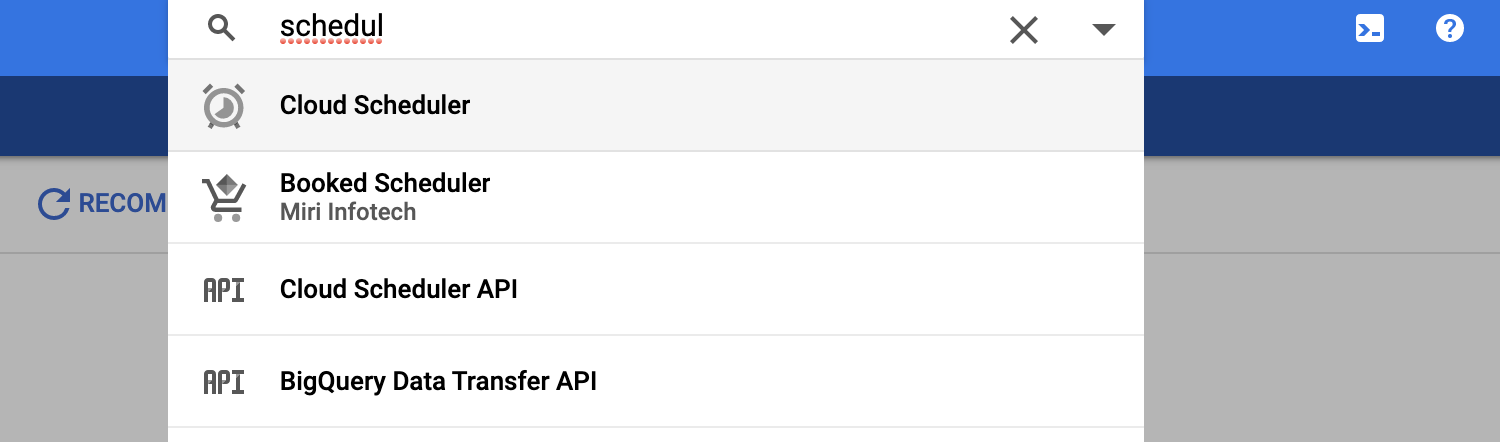
Now, if you go on the Google Cloud Scheduler:
You should be able to see the cron job:

Conclusion
You made it to the end of this tutorial, congratulations :)
In this tutorial, you learnt:
- How to create a Google Cloud project
- How to activate APIs on Google Cloud
- How to create credentials: API Keys, OAuth client ID and Service Accounts
- How to connect to Google Big Query by using R in a non-interactive session
- How to configure docker
- How to run an existing docker container
- How to create a docker image
- How to run a newly created docker container
- How to deploy a docker image on Google Cloud
- How to configure the GoogleCloudRunner package
- How to create a cloud build by using a docker image
- How to schedule a cron job of our cloud build
You can now do wonders with this knowledge:
- Integrate your code in other developers’ code, even if they are using another language
- Share you code with others, knowing that it will always run smoothly
- Deploy your code into production by using Google Cloud or other cloud services
- Create cron jobs on Google Cloud to put code into production
- Make calls to the Big Query API in a non-interactive environment
If you enjoyed this tutorial, don’t hesitate to connect with me on LinkedIn
Happy Coding :)
Arben